
Introduction
(Outline View)Microsoft Word is a powerful word-processing tool widely used for creating, editing, and formatting documents. One of its lesser-known but highly effective features is the Outline View. This feature allows users to organize and structure their documents efficiently, making it easier to manage complex and lengthy content. In this article, we will explore how to use Outline View in Microsoft Word, covering everything from its basic functions to advanced techniques.
What is Outline View?
 2")
Outline View in Microsoft Word is a feature that provides a hierarchical structure for your document. It allows you to collapse and expand sections, move text easily, and view the overall structure of your document. This view is particularly useful for long documents such as research papers, reports, and books, where maintaining a clear structure is essential.
Benefits of Using Outline View
Using Outline in Microsoft Word offers several benefits:
- Enhanced Organization: Helps in organizing and structuring large documents.
- Improved Navigation: Makes it easier to navigate through different sections of the document.
- Efficient Editing: Simplifies the process of moving sections around.
- Clear Overview: Provides a bird’s-eye view of the document structure.
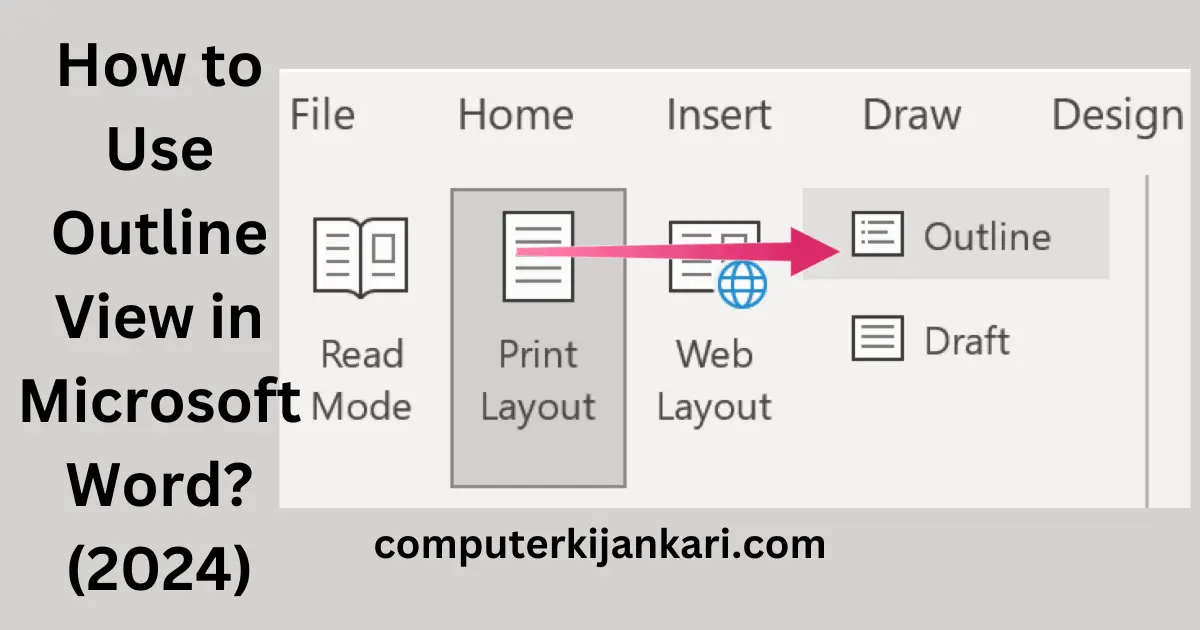
How to Access Outline View
To access Outline in Microsoft Word:
- Open your document in Microsoft Word.
- Click on the “View” tab in the Ribbon.
- Select “Outline” from the available options.
Understanding the Outline Toolbar
The Outline Toolbar in Microsoft Word provides various tools to manipulate the structure of your document. Key tools include:
- Promote: Moves a heading up one level.
- Demote: Moves a heading down one level.
- Move Up: Moves the selected section up.
- Move Down: Moves the selected section down.
- Expand: Expands the selected heading to show its subheadings.
- Collapse: Collapses the selected heading to hide its subheadings.
Creating an Outline
To create an outline in Microsoft Word:
- Enter Outline View.
- Start typing your headings and subheadings.
- Use the Promote and Demote buttons to adjust the levels of your headings.
Formatting Headings in Outline View
Formatting headings in Outline helps to distinguish between different levels of the document. You can:
- Apply Styles: Use built-in heading styles (e.g., Heading 1, Heading 2).
- Change Fonts and Colors: Customize the appearance of your headings.
Navigating Your Document in Outline View
Navigating your document in Outline is straightforward. You can:
- Collapse and Expand Sections: Click on the plus or minus icons next to the headings.
- Jump to Sections: Click on a heading to jump to that section in the document.
Editing in Outline View
Editing your document in Outline is efficient. You can:
- Move Sections: Drag and drop headings to reorder sections.
- Delete Sections: Select and delete headings to remove sections.
- Copy and Paste: Use standard copy and paste functions to duplicate sections.
Advanced Features of Outline View
Using Master Documents
Master Documents allow you to manage large documents by linking multiple subdocuments. This feature is particularly useful for:
- Breaking Down Large Projects: Manage parts of a large project separately.
- Collaborative Work: Allow multiple people to work on different sections simultaneously.
Customizing Outline Levels
You can customize the number of levels displayed in Outline View to suit your needs:
- Click on the “Show Level” dropdown in the Outline Toolbar.
- Select the number of levels you want to display.
Working with Tables and Figures
In Outline View, tables and figures can be managed by:
- Inserting Placeholders: Use placeholders for tables and figures to maintain the structure.
- Moving Objects: Drag and drop tables and figures within the outline.
Common Issues and Troubleshooting
Misaligned Headings
If your headings are misaligned:
- Ensure that the correct heading styles are applied.
- Use the Promote and Demote buttons to adjust heading levels.
Collapsed Sections Not Expanding
If sections do not expand:
- Check if the document is in Outline View.
- Ensure that the heading contains subheadings or content.
Outline View Not Available
If Outline View is not available:
- Verify that you are using a compatible version of Microsoft Word.
- Ensure that the document is not in compatibility mode.
Best Practices for Using Outline View
Consistent Heading Styles
Maintain consistency in your document by using predefined heading styles. This helps in:
- Uniform Structure: Ensuring a uniform look throughout the document.
- Ease of Navigation: Making it easier to navigate and edit the document.
Regular Saving
Save your document regularly to prevent data loss. Use:
- AutoSave: Enable AutoSave if using Microsoft Word 365.
- Manual Save: Save manually using Ctrl + S.
Backup Copies
Keep backup copies of your document to avoid losing important information. Use:
- Cloud Storage: Save copies on cloud storage services like OneDrive or Google Drive.
- External Drives: Store backups on external hard drives or USB drives.
Conclusion
Outline View in Microsoft Word is an invaluable tool for organizing and managing large documents. By understanding its features and applying best practices, you can enhance your productivity and create well-structured documents with ease. Whether you are working on a research paper, a report, or a book, Outline View will help you keep everything in order and make the editing process more efficient.