Learn Canva.com Step-by-Step Complete Guide 2024
Intruduction:-
Shortcut key
Click here
Canva.com is a popular online graphic design platform that allows users to create stunning and professional-looking designs with ease. It was founded in 2012 by Melanie Perkins, Cliff Obrecht, and Cameron Adams, with the aim of making graphic design accessible to everyone, regardless of their design experience or expertise.
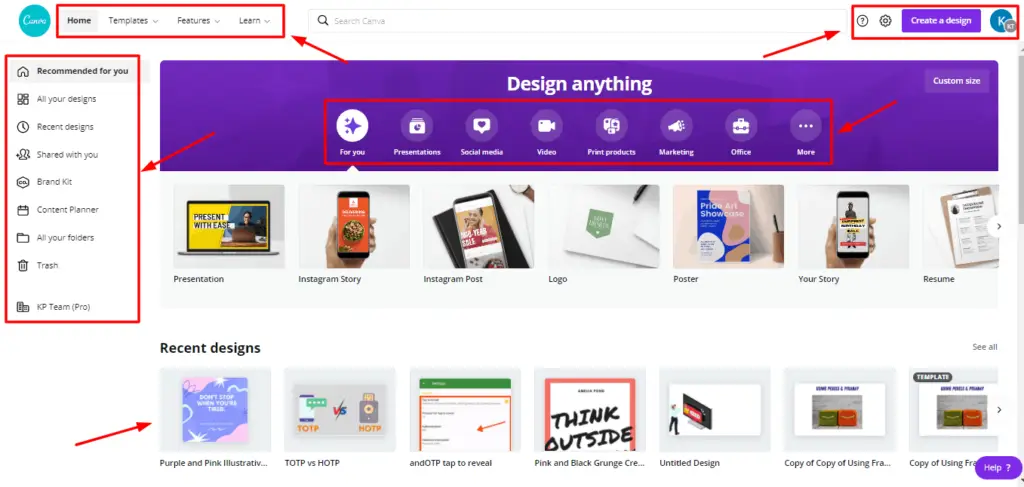
Understanding the Canva Interface

1. Dashboard: When you log in to Canva.com, you’ll see the dashboard, which displays your recent designs, templates, and folders. You can also start a new design from here.
2. Design Types: Canva offers a wide range of design types, including social media posts, presentations, flyers, business cards, and more. You can choose the design type that suits your needs.
3. Templates: Canva provides a vast library of templates for different design categories. These templates are professionally designed and can be customized to fit your requirements. You can search for templates based on keywords or browse through various categories.
4. Editing Tools: Canva offers a user-friendly interface with a drag-and-drop editor. You can add elements like text, images, shapes, icons, and backgrounds to your design. Canva also provides tools to resize, crop, rotate, and arrange elements on the canvas.
5. Text Editing: Canva allows you to customize text by choosing different fonts, sizes, colors, and styles. You can also apply text effects like shadows, outlines, and gradients. Canva supports multiple text layers, allowing you to create visually appealing typography.
6. Image Editing: Canva provides basic image editing tools to enhance your images. You can adjust brightness, contrast, saturation, and apply filters to give your images a professional look. Canva also offers a vast library of stock photos and illustrations that you can use in your designs.
7. Collaboration: Canva allows you to collaborate with others on your designs. You can invite team members to edit or comment on your designs, making it easy to work together on projects.
These are just some of the main features of the Canva interface. It’s a versatile platform that offers a lot of creative possibilities for designing visually appealing graphics. Feel free to explore and experiment with different elements to create stunning designs.
Creating Your Canva Account

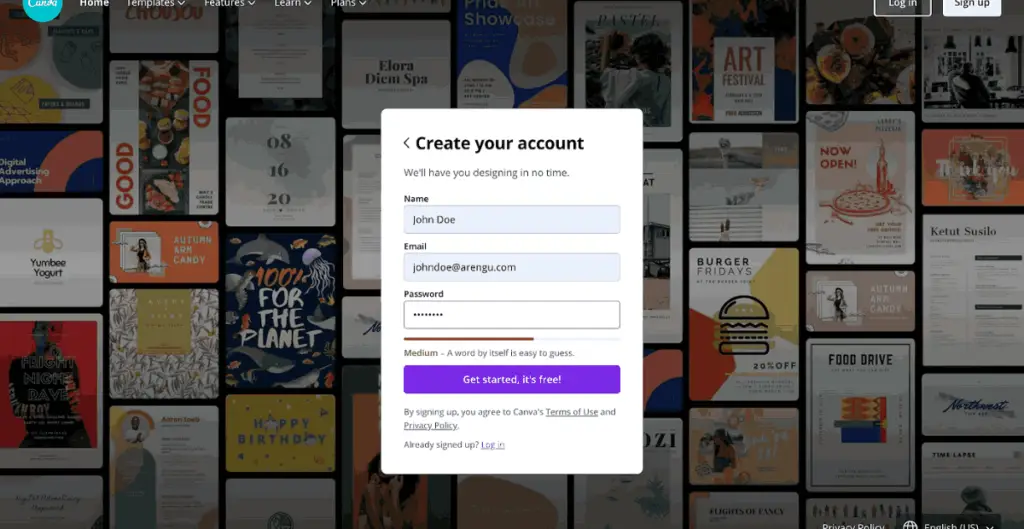
1. Visit the Canva.com website: Go to the Canva website by typing “canva.com” in your web browser’s address bar.
2. Sign up: On the Canva homepage, you’ll see a “Sign up” button at the top right corner. Click on it to start the registration process.
3. Choose a sign-up method: Canva offers different sign-up options. You can sign up using your Google account, Facebook account, or email address. Select the option that suits you best.
4. Sign up with email: If you choose to sign up with your email address, you’ll need to provide your name, email address, and password. Make sure to choose a strong password to secure your account.
5. Verify your email: After providing your email address, Canva will send you a verification email. Go to your email inbox and click on the verification link to confirm your email address.
6. Complete your profile: Once you’ve verified your email, Canva will ask you to complete your profile. You can add your name, profile picture, and select your interests to personalize your experience.
7. Explore Canva: After completing your profile, you’ll be directed to the Canva dashboard. From here, you can start creating designs, browse templates, and explore the various features Canva offers.
Exploring Canva Design Types
1. Social Media Posts: Canva.com provides templates specifically designed for popular social media platforms like Facebook, Instagram, Twitter, LinkedIn, and more. You can create eye-catching posts to engage your audience and promote your brand or content.
2. Presentations: Canva offers templates for creating professional and visually appealing presentations. Whether you need to prepare a business presentation, a school project, or a creative pitch, Canva has a variety of templates to choose from.
3. Flyers and Posters: With Canva, you can design eye-catching flyers and posters for events, promotions, or announcements. There are templates available for different sizes and purposes, allowing you to customize them according to your needs.
4. Business Cards: Canva.com allows you to design personalized business cards to make a lasting impression. You can choose from a range of templates and customize them with your own logo, contact information, and branding elements.
5. Infographics: Infographics are a great way to visually represent data and information. Canva.com provides templates and tools to create visually appealing and informative infographics for presentations, reports, or social media sharing.
6. Resumes: Canva offers templates for creating professional resumes that stand out. You can customize the templates with your own information, skills, and experiences to create a visually appealing resume that highlights your qualifications.
7. Invitations: Whether it’s a birthday party, wedding, or any other special event, Canva has templates for designing invitations. You can personalize them with your event details, theme, and images.
Mastering Basic Design Tools

1. Text Tool: The text tool allows you to add and customize text in your designs. You can choose from a variety of fonts and adjust the font size, color, and alignment. Canva.com also provides options to apply text effects like shadows, outlines, and gradients.
2. Image Tool: The image tool enables you to add, upload, and customize images in your designs. You can search for images in Canva’s extensive library of stock photos and illustrations. Additionally, you can upload your own images and resize, crop, or apply filters to enhance them.
3. Shape Tool: The shape tool allows you to add various shapes to your designs, such as rectangles, circles, arrows, and more. You can customize the size, color, and opacity of the shapes to fit your design requirements.
4. Elements Tool: The elements tool provides a wide range of design elements, including icons, illustrations, stickers, and more. These elements can be used to enhance your designs and add visual interest. You can resize, rotate, and customize the colors of these elements.
5. Background Tool: The background tool allows you to change the background of your design. You can choose from solid colors, gradients, patterns, or upload your own images as the background. This tool helps you create a cohesive and visually appealing design.
6. Alignment and Arrangement: Canva.com offers alignment and arrangement tools that help you position and arrange elements precisely. You can align elements to the center, top, bottom, left, or right of the canvas. You can also arrange elements forward or backward to control their layering.
7. Undo and Redo: Canva provides undo and redo buttons that allow you to revert or redo any changes you’ve made to your design. These buttons are handy when you want to experiment or correct any mistakes.
Advanced Design Techniques in Canva

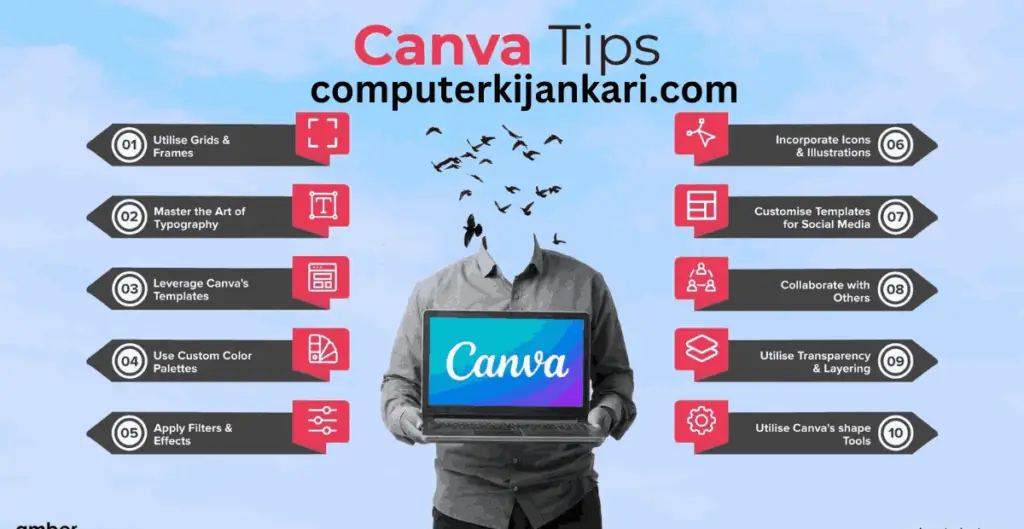
1. Layering and Grouping: Canva.com allows you to layer elements on top of each other to create depth and visual interest. You can arrange elements forward or backward using the arrangement tools. Grouping elements together can also help you manage and manipulate them as a single unit.
2. Customizing Templates: Canva offers a wide range of templates for various design types. However, you can make these templates truly your own by customizing them extensively. Experiment with different colors, fonts, and images to match your brand or personal style.
3. Using Grids and Guides: Canva.com provides grids and guides that can assist you in aligning elements precisely. Grids help you maintain consistency and balance in your design, while guides can help you align elements to specific positions or measurements.
4. Applying Filters and Effects: Canva.com offers a variety of filters and effects that can enhance the visual appeal of your images. Experiment with different filters to achieve the desired mood or style. You can also apply effects like shadows, glows, and blurs to add depth and dimension to your designs.
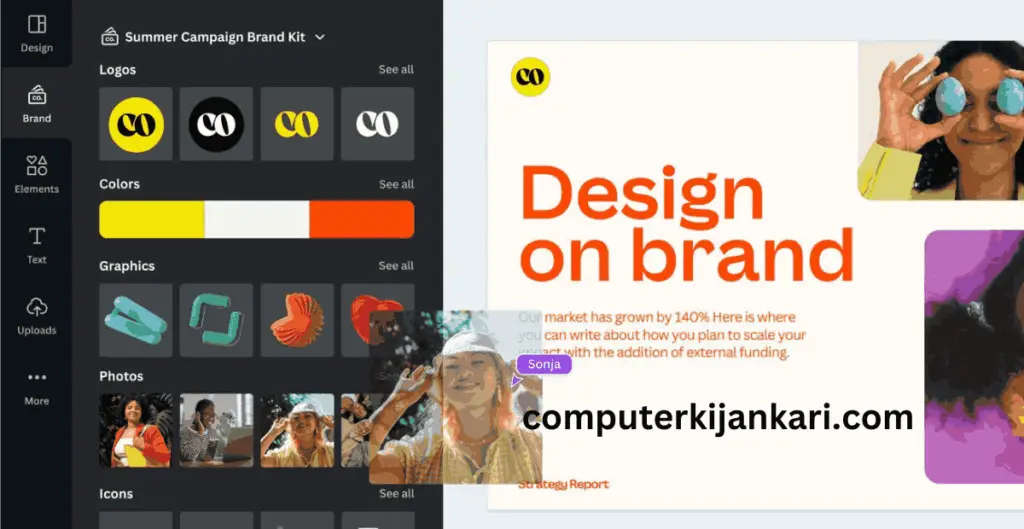
5. Incorporating Branding: If you’re designing for a brand or business, it’s important to incorporate branding elements consistently. Canva.com allows you to upload your own logos, fonts, and color palettes, ensuring that your designs align with your brand identity.
6. Using Advanced Text Effects: Canva.com provides advanced text effects like curved text, text masks, and letter spacing adjustments. These effects can add creativity and uniqueness to your designs. Experiment with different text effects to make your typography stand out.
7. Utilizing Animation: Canva.com also offers animation features for certain design types, such as social media posts. You can add subtle animations to elements like text, icons, or images to make your designs more engaging and attention-grabbing.
Utilizing Canva's Stock Library
1. Searching for Images: Canva’s stock library has powerful search functionality. You can enter keywords related to the type of image you’re looking for, such as “nature,” “business,” or “food.” Canva will display relevant results that you can browse through.
2. Exploring Categories: Canva organizes its stock library into categories, making it easier to find specific types of images. You can browse through categories like “Nature,” “Technology,” “Travel,” and many more. This can be helpful if you’re looking for inspiration or have a specific theme in mind.
3. Filtering Results: Canva.com allows you to filter search results based on various criteria. You can filter by image type (photo, illustration, icon), orientation (landscape, portrait), color, and more. These filters help you narrow down your search and find the perfect image for your design.
4. Previewing and Selecting Images: When you find an image you like, you can preview it in different sizes and orientations to see how it fits your design. Once you’re satisfied, you can click on the image to add it to your design canvas.
5. Customizing Images: Canva.com provides editing tools that allow you to customize the selected images. You can resize, crop, rotate, and apply filters to the images to suit your design requirements. This flexibility ensures that the stock images seamlessly integrate into your designs.
6. Uploading Your Own Images: In addition to the stock library, Canva allows you to upload your own images. If you have specific images or branding assets that you want to incorporate into your designs, you can easily upload them and use them alongside the stock library.
7. Saving Favorites: Canva allows you to save your favorite images to a dedicated folder for easy access in future designs. This feature is handy when you come across images that you may want to use later or for consistent branding purposes.
Collaborating on Canva
1. Sharing Designs: To collaborate on a design, you can start by sharing it with others. In Canva.com, click on the “Share” button located at the top right corner of the editor. You can then choose whether to share your design via email, by generating a link, or by inviting others to collaborate directly.
2. Inviting Collaborators: If you want to invite specific individuals to collaborate on your design, you can enter their email addresses in the “Invite People” field. Canva will send them an email invitation with a link to access the design.
3. Setting Permissions: When inviting collaborators, you can choose the level of access they have to your design. Canva offers three permission levels: “Can view,” “Can comment,” and “Can edit.” “Can view” allows collaborators to only view the design; “Can comment” allows them to leave comments; and “Can edit” allows them to make changes to the design.
4. Commenting and Feedback: Collaborators with commenting or editing access can leave comments directly on the design. This feature is handy for providing feedback, making suggestions, or discussing design elements. You can reply to comments and have threaded conversations to facilitate collaboration.
5. Version History: Canva keeps track of the design’s version history, allowing you to view and restore previous versions. This feature is useful if you want to revert to an earlier iteration or compare changes made by different collaborators.
6. Real-time Collaboration: Canva enables real-time collaboration, meaning multiple collaborators can work on the design simultaneously. You can see the changes made by others in real-time, making it easy to coordinate and work together efficiently.
7. Collaboration Notifications: Canva.com sends notifications to collaborators when changes are made or comments are added to the design. This ensures that everyone stays updated on the progress and can provide timely feedback or input.
Exporting and Downloading Your Designs
1. Finalize Your Design: Before exporting or downloading your design, make sure it’s complete and meets your requirements. Double-check for any errors or adjustments you may need to make.
2. Click on the Download Button: In the Canva editor, locate the download button, which is typically located in the top right corner. It looks like a downward-facing arrow or a download icon. Click on it to proceed.
3. Choose Your File Format: Canva.com offers various file formats for downloading your design, depending on your needs. Common file formats include PNG, JPEG, PDF, and SVG. Select the desired file format from the options provided.
4. Select the Download Quality: Canva allows you to choose the quality of your downloaded design. Higher-quality options usually result in larger file sizes. Select the quality that suits your requirements, considering factors like image resolution and file size.
5. Start the Download: After selecting the file format and quality, click on the “Download” or “Export” button to initiate the download process. Canva will generate and prepare your design file for download.
6. Save the File: Once the download is complete, your browser will prompt you to save the file. Choose the location on your computer or device where you want to save the design file. You can also rename the file if desired.
7. Access Downloads in Canva: Canva also keeps a record of your downloaded designs within the platform. To access your previously downloaded designs, go to your Canva account’s “Downloads” section. This allows you to easily access and re-download designs, if needed.
Optimizing Designs for Different Platforms
Optimizing your designs for different platforms is essential to ensuring they look their best and are well-suited for the specific requirements of each platform. Here are some tips to help you optimize your designs for different platforms:
1. Understand Platform Requirements: Each platform has its own specifications for image sizes, resolutions, and aspect ratios. Before creating your design, research the requirements of the platform you’ll be using. This will help you create designs that fit perfectly and avoid any cropping or distortion issues.
2. Use Templates: Canva offers templates specifically designed for various platforms, such as social media posts, presentations, or print materials. These templates are pre-sized and optimized for the specific platform, making it easier for you to create designs that fit the platform’s requirements.
3. Adjust Layout and Composition: When adapting your design for different platforms, consider the layout and composition. Some platforms may require a more vertical or horizontal orientation, while others may have specific areas where important elements should be placed. Make the necessary adjustments to ensure your design looks balanced and visually appealing on each platform.
4. Optimize Typography: Font sizes and styles may need to be adjusted for different platforms. Ensure that your text remains legible and visually appealing when viewed on different devices or screen sizes. Consider using larger fonts for mobile platforms, where screen space may be limited.
5. Test responsiveness: If you’re designing for responsive platforms like websites or mobile apps, test your design on different screen sizes and devices. This will help you identify any issues with scaling, readability, or element placement. Make adjustments as needed to ensure a consistent and user-friendly experience across devices.
6. Consider Branding and Visual Consistency: While adapting your design for different platforms, maintain visual consistency and incorporate your brand elements. Use consistent colors, fonts, and imagery to reinforce your brand identity across all platforms.
7. Optimize file formats: Different platforms may have specific file format requirements. For example, social media platforms often prefer JPEG or PNG files, while print materials may require PDF files. Export your designs in the appropriate file format to ensure compatibility and optimal quality.
Troubleshooting Tips and Tricks
Encountering issues while working on designs can be frustrating, but here are some troubleshooting tips and tricks to help you overcome common challenges in Canva:
1. Clear Browser Cache: If you’re experiencing slow loading times or glitches in Canva, clearing your browser cache can often resolve the issue. Go to your browser settings, find the option to clear browsing data, and select the cache or temporary files option.
2. Check the Internet Connection: Ensure that you have a stable internet connection. Unstable or slow internet can cause Canva to load slowly or experience connectivity issues. Consider switching to a different network or contacting your internet service provider if the problem persists.
3. Update Browser: Make sure you’re using the latest version of your browser. Outdated browsers may not be fully compatible with Canva’s features, which can lead to performance issues. Update your browser to the latest version available.
4. Disable Browser Extensions: Some browser extensions or add-ons can interfere with Canva’s functionality. Try disabling any extensions that you have installed and see if the issue resolves. If it does, you can selectively enable extensions to identify the one causing the problem.
5. Restart Device: If you’re encountering unusual behavior or glitches in Canva, try restarting your computer or device. Sometimes, a simple restart can resolve temporary issues and restore normal functionality.
6. Contact Support: If you’re facing persistent issues that you can’t resolve on your own, reach out to Canva’s customer support. They can provide specific guidance and assistance based on the problem you’re experiencing. Look for the support or contact options on Canva’s website or within the platform.
7. Explore Canva’s Help Center: Canva has a comprehensive Help Center with articles and tutorials that cover a wide range of topics. If you have a specific question or issue, searching the Help Center can often provide you with step-by-step instructions or solutions.
Remember, troubleshooting can vary depending on the specific problem you’re facing. It’s always a good idea to provide detailed information about the issue when seeking support, as it helps in diagnosing and resolving the problem more effectively.
Staying Updated with Canva Features
1. Official Canva Website: Visit the official Canva website regularly to stay up-to-date with the latest news and updates. Canva often announces new features, enhancements, and important information on their website. Keep an eye on their blog or news section for any announcements.
2. Canva’s Social Media Channels: Follow Canva on social media platforms like Facebook, Twitter, Instagram, and LinkedIn. Canva regularly shares updates, tutorials, and feature announcements on these channels. By following them, you’ll be among the first to know about new features and updates.
3. Canva’s Email Newsletter: Subscribe to Canva’s email newsletter to receive updates directly in your inbox. Canva often sends out newsletters with information about new features, tips, and inspiration. You can sign up for the newsletter on Canva’s website or within your Canva account settings.
4. Canva.com Design School: Explore Canva’s Design School, a resource hub that provides tutorials, design tips, and inspiration. They often publish articles and tutorials about new features and how to make the most of them. Check the Design School regularly to stay informed about the latest additions to Canva.
5. Canva Community: Join the Canva.com Community, an online forum where users can share ideas, ask questions, and discuss Canva-related topics. The community is a great place to connect with other Canva users, learn from their experiences, and stay updated on new features or updates.
6. Webinars and Events: Keep an eye out for webinars or virtual events hosted by Canva.com. They often conduct webinars to introduce new features and provide demonstrations on how to use them effectively. Participating in these events can give you firsthand knowledge of the latest features and their functionalities.
7. In-App Notifications: Canva occasionally sends in-app notifications to users about new features, updates, or important information. Make sure to check your Canva account regularly and pay attention to any notifications you receive within the platform.
Mastering canva.com shortcut
Mastering Canva.com shortcuts can significantly improve your efficiency and speed when working on designs. Here are some essential keyboard shortcuts to help you navigate and utilize Canva.com effectively:
1. General Shortcuts:
– Ctrl + N (or Command + N): Create a new design.
– Ctrl + O (or Command + O): Open an existing design.
– Ctrl + S (or Command + S): Save the current design.
– Ctrl + Z (or Command + Z): Undo the last action.
– Ctrl + Y (or Command + Y): Redo the last undone action.
– Ctrl + X (or Command + X): Cut selected elements.
– Ctrl + C (or Command + C): Copy selected elements.
– Ctrl + V (or Command + V): Paste copied or cut elements.
– Delete (or Backspace): Delete selected elements.
2. Canvas Navigation:
– Spacebar + Click and Drag: Pan the canvas.
– Ctrl + Plus (+) or Minus (-): Zoom in or out on the canvas.
– Ctrl + 0 (or Command + 0): Reset zoom level to fit the canvas.
3. Text Editing:
– Ctrl + B (or Command + B): Bold selected text.
– Ctrl + I (or Command + I): Italicize selected text.
– Ctrl + U (or Command + U): Underline selected text.
– Ctrl + Shift + K (or Command + Shift + K): Strikethrough selected text.
– Ctrl + Shift + > (or Command + Shift + >): Increase font size.
– Ctrl + Shift + < (or Command + Shift + <): Decrease font size.
4. Element Manipulation:
– Arrow Keys: Move selected elements by one pixel in the respective direction.
– Shift + Arrow Keys: Move selected elements by ten pixels in the respective direction.
– Ctrl + Shift + D (or Command + Shift + D): Duplicate selected elements.
– Ctrl + G (or Command + G): Group selected elements.
– Ctrl + Shift + G (or Command + Shift + G): Ungroup selected elements.
– Ctrl + ] (or Command + ]): Bring selected elements forward.
– Ctrl + [ (or Command + [): Send selected elements backward.
5. Alignment and Distribution:
– Ctrl + Shift + A (or Command + Shift + A): Select all elements on the canvas.
– Ctrl + E (or Command + E): Align selected elements horizontally.
– Ctrl + Shift + E (or Command + Shift + E): Align selected elements vertically.
– Ctrl + Shift + L (or Command + Shift + L): Distribute selected elements evenly horizontally.
– Ctrl + Shift + J (or Command + Shift + J): Distribute selected elements evenly vertically.
These are just a few of the many keyboard shortcuts available in Canva.com. Familiarize yourself with these shortcuts and practice using them regularly to speed up your workflow and become a Canva power user.
FAQs About Learning Canva.com in 2024
Q: Is Canva suitable for beginners?
A: Absolutely! Canva.com caters to all skill levels, offering a user-friendly interface and extensive resources for beginners.
Q: Can I collaborate with others on Canva?
A: Yes, collaboration is a key feature. Invite team members to work on projects, facilitating seamless teamwork.
Q: How often does Canva introduce new features?
A: Canva regularly updates its features. Stay informed to leverage the latest tools and enhancements.
Q: Are there troubleshooting resources for Canva?
A: Certainly! Learn effective troubleshooting tips to overcome any obstacles you encounter while using Canva.
Q: Can I use Canva for professional projects?
A: Absolutely! Canva is versatile and suitable for both personal and professional design projects.
Q: How do I export my designs from Canva?
A: Master the art of exporting and downloading designs with our step-by-step guide for different file formats and resolutions.
Conclusion
Congratulations! You’ve completed the ultimate guide on how to learn Canva.com step-by-step in 2024. Embrace your newfound skills and let your creativity soar. Remember, Canva.com is not just a tool; it’s your gateway to limitless design possibilities.


